Integrate with Portainer
Support level: Community
What is Portainer
Portainer is a powerful, GUI-based Container-as-a-Service solution that helps organizations manage and deploy cloud-native applications easily and securely.
This documentation has been tested with authentik 2025.10.3 and Portainer 2.33.6 LTS.
Preparation
The following placeholders are used in this guide:
portainer.companyis the FQDN of the Portainer installation.authentik.companyis the FQDN of the authentik installation.
This documentation lists only the settings that you need to change from their default values. Be aware that any changes other than those explicitly mentioned in this guide could cause issues accessing your application.
authentik configuration
To support the integration of Portainer with authentik, you need to create an application/provider pair in authentik.
Create an application and provider in authentik
- Log in to authentik as an administrator and open the authentik Admin interface.
- Navigate to Applications > Applications and click Create with Provider to create an application and provider pair. (Alternatively you can first create a provider separately, then create the application and connect it with the provider.)
- Application: provide a descriptive name, an optional group for the type of application, the policy engine mode, and optional UI settings.
- Choose a Provider type: select OAuth2/OpenID Connect as the provider type.
- Configure the Provider: provide a name (or accept the auto-provided name), the authorization flow to use for this provider, and the following required configurations:
- Note the Client ID, Client Secret, and slug values because they will be required later.
- Set a
Strictredirect URI tohttps://portainer.company/. - Select any available signing key.
- Configure Bindings (optional): you can create a binding (policy, group, or user) to manage the listing and access to applications on a user's My applications page.
- Click Submit to save the new application and provider.
Portainer configuration
- Login to Portainer as a user with administrative privileges.
- Navigate to Settings > Authentication.
- Under Authentication method, select OAuth, and under Provider select Custom.
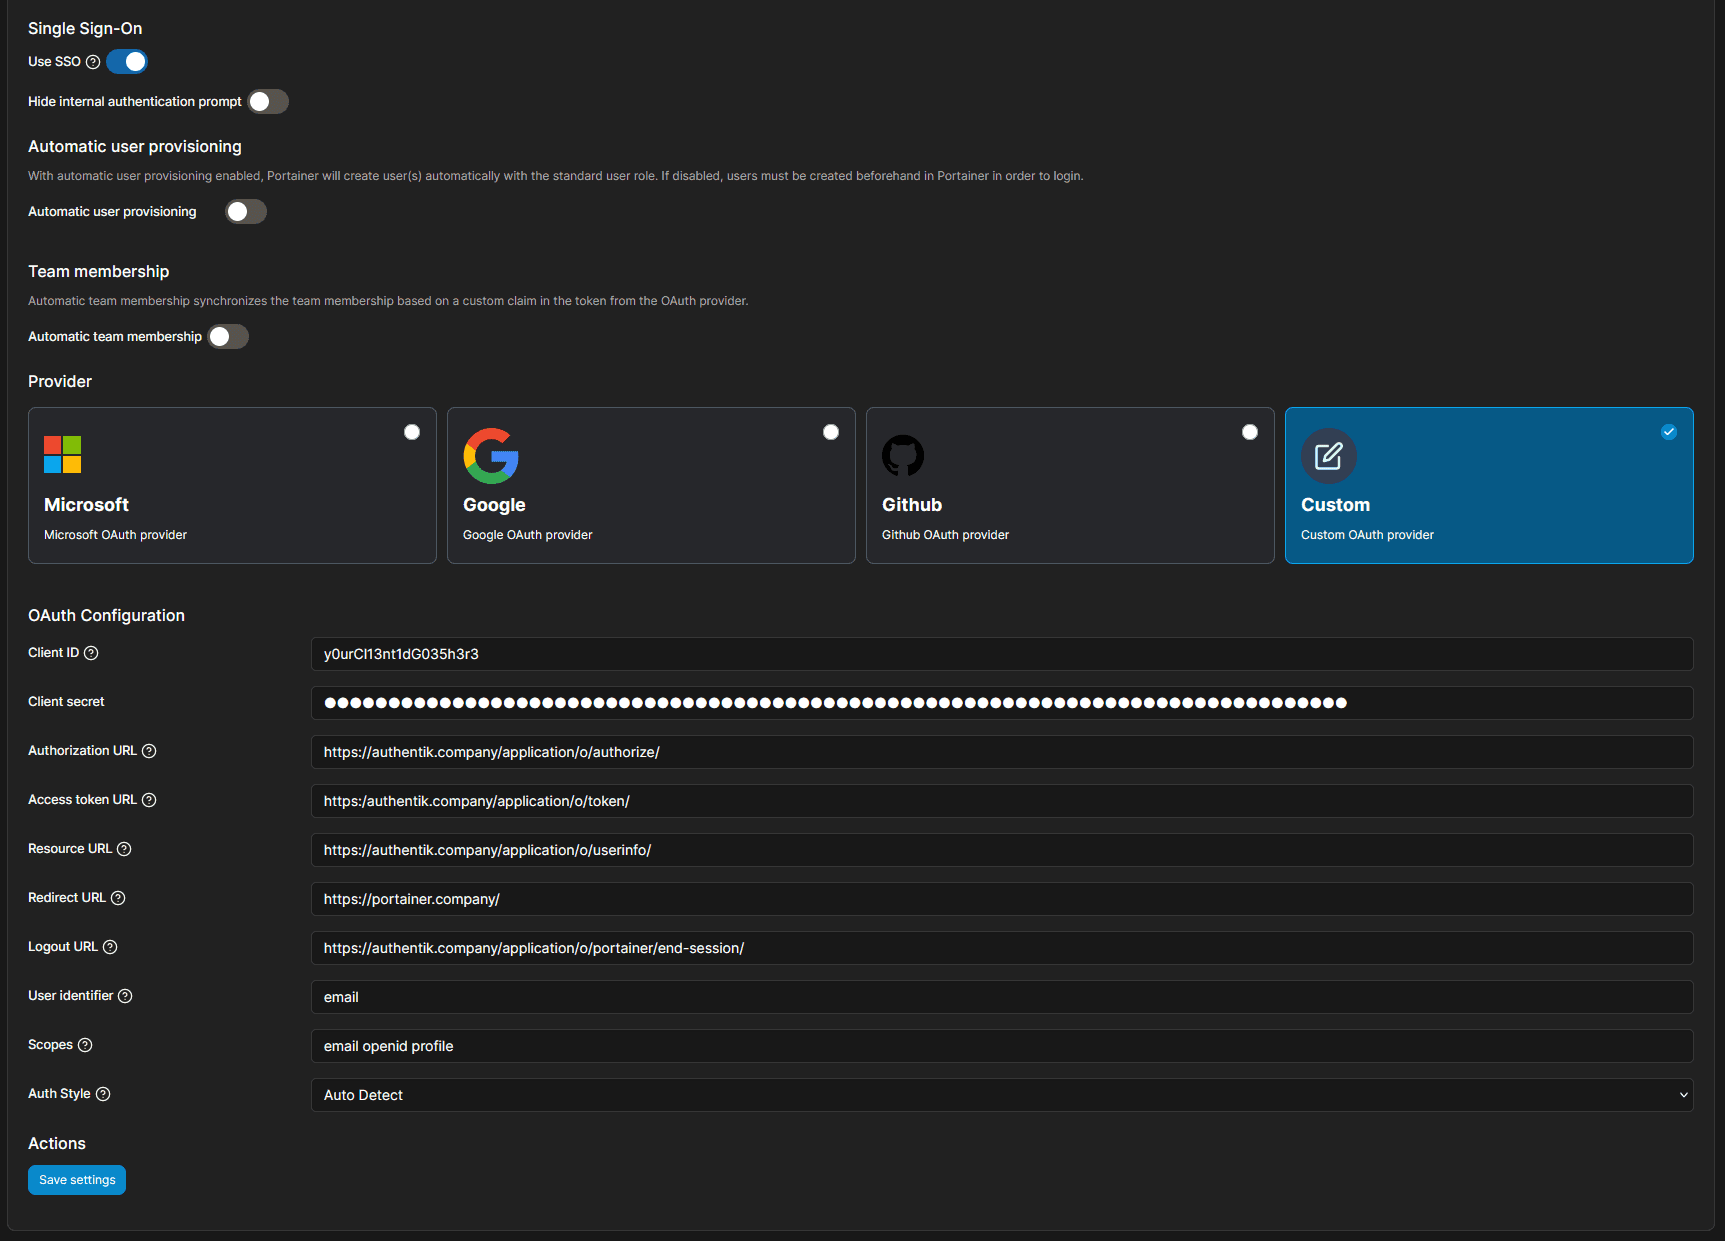
- Under OAuth Configuration, enter the following values:
- Client ID: The
Client IDfrom the authentik provider - Client Secret: The
Client secretfrom the authentik provider - Authorization URL:
https://authentik.company/application/o/authorize/ - Access Token URL:
https://authentik.company/application/o/token/ - Resource URL:
https://authentik.company/application/o/userinfo/ - Redirect URL:
https://portainer.company/ - Logout URL:
https://authentik.company/application/o/portainer/end-session/ - User Identifier:
preferred_username(oremailif you would prefer to use email addresses as identifiers) - Scopes:
email openid profile.
- Client ID: The
- Click Save settings.
By default, Portainer shows commas between each item in the Scopes field. Do NOT use commas. Use a space.
Configure automatic team membership in Portainer BE (optional)
If you are using Portainer Business Edition (BE), it is possible to configure automatic team membership. This allows you to grant access to teams and environments, and automatically grant admin access to certain users based on authentik group membership. It is only possible to configure automatic group membership in Portainer BE - this cannot be configured in the Community Edition.
For this section, we will presume that you already have two teams configured in Portainer: engineering and sysadmins. Please reference Portainer's documentation for information on managing teams and access to environments based on team membership.
We will also presume that two groups have been created in authentik: Portainer Admins and Portainer Users. See Manage groups. You can choose any group names - replace Portainer Admins and Portainer Users later in this guide with your chosen names.
Create a property mapping
-
Log in to authentik as an administrator and open the authentik Admin interface.
-
Navigate to Customization > Property Mappings and click Create.
-
Select type: select Scope Mapping.
-
Configure the Scope Mapping: Provide a descriptive name (e.g.
authentik portainer OpenID Mapping: OAuth 'groups'), and an optional description.- Scope name:
groups - Expression:
groups = []

if request.user.ak_groups.filter(name="Portainer Admins").exists():
    groups.append("admin")

if request.user.ak_groups.filter(name="Portainer Users").exists():
    groups.append("user")

return {
    "groups": groups
}
In the expression above, we filter on the group names
Portainer AdminsandPortainer Users. You can use any groups that exist in authentik - just ensure that the group names entered here exactly match those setup in authentik (they are case-sensitive). - Scope name:
-
-
Click Finish.
-
Navigate to Applications > Providers.
-
Select your provider for Portainer, and click Edit.
-
Under Advanced protocol settings, add the property mapping created in the previous step to selected scopes.
-
Click Update to save your changes to the provider.
-
Navigate to Directory > Groups.
-
Add users to each of the groups that you have defined in your expression, as desired.
Since we are configuring access to Portainer based on group membership, It is recommended that you configure a binding (policy, group, or user) for the application in authentik such that access is restricted to these groups.
Update your configuration in Portainer
- Login to Portainer as a user with administrative privileges.
- Navigate to Settings > Authentication.
- Under Team Membership, toggle Automatic team membership to ON, and complete configuration as follows:
- Claim name:
groups - Statically assigned teams: Add two team mappings with the following values:
- client value regex
^user$maps to teamengineering. - client value regex
^admin$maps to teamsysadmins.
- client value regex
- Default team:
engineering - Admin mapping:
- Toggle Assign admin rights to group(s) to ON.
- Add one admin mapping, and set client value regex to
^admin$.
- Claim name:
- Under Provider > OAuth Configuration, append
groupsto Scopes. The full value for Scopes should then beemail openid profile groups. - Click Save settings.

Configuration verification
To verify the integration of authentik with Portainer, log out of Portainer, then on the login page click Login with OAuth. You should be redirected to authentik and, after successful authentication, automatically logged in to Portainer.